Sausage & Bread Stuffing with Persimmons

Not to be weird, but it’s been a while. How are you? Still eating food? Great, I think we can pick up pretty much where we left off.

I’ve now lived in the US for about 15 years, and so have become very accustomed and comfortable with the local cuisine, especially around this time of year for the traditional over-indulgence that is Thanksgiving.

In years past, my speciality has been to hide large quantities of cheese inside mashed potato, but this year my partner’s brother claimed the mash, so I had to learn to make something else.

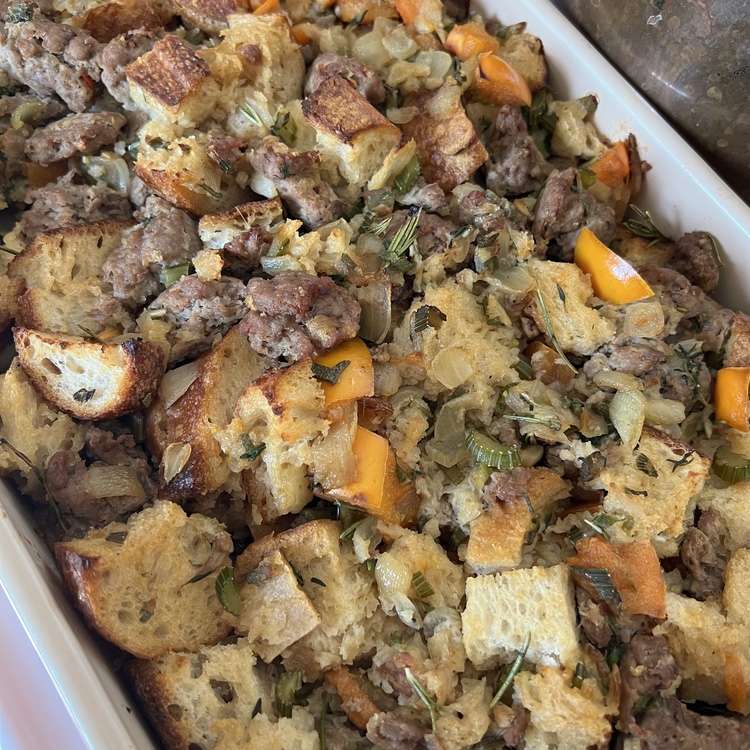
Putting aside the misnomer of “stuffing” when it’s not stuffed inside the bird you’re eating (mostly because doing so ruins the cooking of said bird so I’m entirely fine with not doing it “properly”), stuffing done right is basically a savoury bread putting with a good combination of soft bread and crispy edges from baking.

One fact about Thanksgiving food that I acknowledge while not-entirely-respecting, is the love of sweet: There are some truly indulgent sweet dishes in a Thanksgiving buffet: There’s sugar everywhere, and sweet yams topped with marshmallows are infamous. I have no strong desire to eat that (again), but this week my farm box stocked me with a load of persimmons, so I’ve integrated them into this bread and sausage stuffing to provide a little sweet kick, and it’s great.

The baked stuffing in a white dish

Recipe

Make the night before and let sit overnight to develop flavour, and then bake to serve.

For the Sausage

  • 450g Ground Lamb
  • 450g Ground Pork
  • 20g Salt
  • Paprika
  • Fennel Seed
  • Ground Coriander
  • Ground Black Pepper
  • 2x Thai Bird Chillis, deseeded and chopped fine.

There’re a lot of ways to approach the sausage; really any combination of meats that appeal to you will work, but I wanted to mix my bases and add a bit of complexity by using lamb with pork. The only downside here is that if you’re not grinding your own meat, you might find that your meat blend is a little leaner than you’d like for sausage. Good recipes will say to salt sausage at about 2% of the weight. Mix all that together until well distributed. Add the spices and chopped chilli and mix until even.

Take a tablespoon sized piece of your sausage meat and fry it, give it a taste and season further as needed before cooking the whole batch.

When I tasted this sausage sample I was a bit underwhelmed by the spicing, but also slightly concerned that 2 chillis had made it too hot. I wanted a little heat because I think it would play really nicely with the fruit. But also, this was for a family meal so I didn’t want anyone with a tender palette to be put off. What I will say is: After the overnight rest, it all mellowed out and if I did it again I might even add more chilli.

Tear the sausage into rough but even chunks and cook on medium-high heat. Don’t make them too small, else they’ll dry out — you can always break them apart further after they’re cooked. Also don’t crowd the pan, you want to develop some crust. Put aside in a bowl for later.

For the rest of the stuffing

  • 1 Loaf Sourdough
  • 1 large onion, 6 cloves of garlic, 3 sticks of celery
  • Fresh Sage, Rosemary, Thyme
  • 2 Cups Chicken Bone Broth
  • 1 Egg
  • 6 Persimmons (diced)
  • Lemon Zest
  • 2 tbsp butter for baking.

First, dry the bread. Chop and tear into 2-3cm cubes. Spread them, not too crowded, on baking sheets and give them 15 minutes in a 200º oven. Be careful not to toast it, though.

There’s a popular and reflexive theory that you should use stale bread for stuffing. This is suboptimal: You should use dry bread. The way that bread goes stale over days is different from if you dry fresh bread in the oven: Stale bread crystallises in a way that dried bread does not, which later affects how the bread absorbs the chicken stock, and properly dried bread will end up with a superior texture when it’s all done.

Once dried, Take a good size handful and keep aside. We’ll add it late in the process to have a mix of textures.

Fry the onion, garlic, and celery with olive oil over medium heat. Give it some salt and pepper. Turn down the heat a bit so that the onions can slowly caramelise a bit.

Separate all the herb leaves from their stems, give a bit of a rough chop, and add them to the frying onions. Let that simmer away for about 5 more minutes, then remove from the heat and let cool in a bowl.

Combine the sausage chunks and fried onion and herbs and mix. Add most of the bread and mix until even.

At this point, crack in the egg, and start adding the chicken broth: Do this increments of about a ladle at a time, so as not to water-log the bread, but for a good sized loaf you’ll find it’ll absorb about two cups. Turn the stuffing over with your hands to combine, which helps you keep an eye on how wet the bread is getting. If you think it’s going to get mushy, stop and keep a little broth aside for tomorrow.

Add the diced persimmons, and turn it all over to combine once more. We save these to the end because they’re going in raw and they can be a little soft and fragile so don’t want to cause them to get mushed. Now, put the entire mixture in the fridge to sit overnight.

In the morning, bring it out, add the bread that you held back, and add the remainder of the broth. Add the lemon zest, and mix it all around one last time. The idea here is that the bread you held back is going to be crispier than that which sat overnight. The overnight bread will be softer, but will have absorbed a glorious amount of broth and herb flavour.

Finally, rub butter all around your baking dish, then empty the mixture into it. Cover with foil.

Depending on your big meal logistics, you can now either bake it for about 30-minutes at 375ºf/190ºc, take it out and then give it a second bake uncovered just before you eat. Or, bake it for 25 minutes and then remove the foil and give it another 20 minutes to brown and crisp. The nature of thanksgiving catering is that this is never going go perfectly, but the stock and the overnight soak did a pretty good job and the stuffing still comes out nice and moist even if it sits in the oven a little long. This is also why it’s quite important not to overcook the sausage before.


The recipe was a success, and the persimmons were a really nice seasonal novelty as part of it. If I could change anything I’d try to improve the sausage to make it a little fattier and retain more juiciness; I might also let it sit overnight raw to develop flavour better (although it still did this well after cooking.)

Stew № 1

As a bit of an experiment in publishing, I went and wrote up a recipe for Stew with stout and chocolate on Medium.

Number 1, then, is a dark brown, beef stew. It’s made in my favourite way for stew—with beer—and though a little bitter, was very flavoursome and enjoyable.

Read it over in the Munch Munch collection on Medium, here

Spinach with pine nuts

I made salmon for dinner tonight, and had spinach and pine nuts to to cook up on the side. In the end the side turned out really nicely, so here’s the recipe.

Ingredients

  • Four handfuls of baby spinach
  • One small onion
  • A clove of garlic
  • 1cm of ginger
  • 1 green chilli
  • ⅓ cup orange juice
  • Balsamic vinegar
  • ⅓ cup of pine-nuts
  • Olive oil

Slice the onion, finely chop the garlic, ginger and chilli. On a medium heat fry the onions, garlic, ginger and chilli together until the onions brown (about 10 minutes.) Turn down the heat a little, then throw in the spinach, pour in the orange juice, and a few splashes of the balsamic vinegar. Add the pine nuts, then gently lift mix the leaves into the oil and sauce, and allow the leaves to wilt.

Stop before the leaves are reduced to mush, serve on the side. It was delicious, the onions were sweet, and the chilli gave it just a little bit of interesting heat.

"Spinach served with Salmon"

Brownie Truffle topped with homemade Salted Caramel

“Mmmm”. “Oh God”.  “I will die”.  “Die-abetes, you mean”.  Just a few of the choice phrases uttered through mouthfuls of chocolate by friends and colleagues on trying these morsels.

This take on a brownie is so rich that a slab baked on a Monday should last until Sunday, disappearing one sticky slither at a time with cups of tea.

I have previously ranted about the qualities of the ideal brownie and, until this recipe came along, I thought I had it sussed.  But adding a decadent layer of salted caramel here elevates this cake above and beyond anything I had thought possible.  Try it.  You’ll never go back.

Brownie mix

Ingredients (makes about 20 small squares)

For the caramel:

  • 75g white caster sugar
  • 50ml double cream
  • 10g unsalted butter
  • ½ tsp sea salt flakes

For the brownie:

  • 100g unsalted butter
  • 150g caster sugar
  • 100g light brown sugar or muscovado, either works a treat
  • 75g golden syrup
  • 300g dark chocolate, chopped into small chunks (80% cocoa if you can get it)
  • 4 eggs
  • 70g plain flour

Instructions

For the caramel:

  • Tip the sugar into a heavy-bottomed saucepan in an even layer. Place over medium  heat
  • Wait until the edges start to liquify then move the sugar around onto the wet spots to melt. Do not stir but keep everything gently moving until you have a liquid
  • Cook until the liquid takes on a copper colour
  • Remove from heat and whisk in 1/3 of the cream (stand back from pan, it will sizzle a fair bit!)
  • Keep pouring and whisking until all the cream is incorporated
  • Add the butter one small chunk at a time and the salt and stir until smooth
  • Pour into a bowl and leave to cool

For the brownie:

  • Preheat the oven to 160C
  • Line a 20x20cm tin
  • In a big saucepan place the butter, caster sugar, brown sugar and syrup
  • Heat until everything is melted then beat until it becomes a smooth mix
  • Take off the heat then add the chocolate and stir until melted
  • Lightly whisk the eggs in a small bowl then incorporate them into the mixture
  • Add the flour and beat thoroughly until very smooth
  • Pour into the prepared tin
  • Spoon your caramel evenly over the mix then use a knife or chopstick to lightly swirl it through
  • Bake for 20 minutes then take out and leave to cool in the tin
  • Once cool, put into the fridge overnight
  • Slice into small squares with a sharp knife.

Brownie cooked

I find this this brownie is so gooey it is best served straight from the fridge and it’ll keep there happily for a week in an airtight container.

Roasted vegetable lasagne

My friends will tell you that I’ve been throwing together big vegetable lasagnes for quite a few years now, but this weekend I think I’ve gone and set a new personal best. Deep tomato sauce, rich caramelised vegetables and strong, smooth cheese sauce on top. I really wish that there were still leftovers to tuck into as I write this, but it didn’t survive past Monday lunchtime. It’ll definitely be back on our menu soon, and I’d love to hear any ideas for what you like in your veggie lasagne.


Aubergines

Ingredients

  • dry lasagne sheets
  • parmesan (or another hard cheese like grana padano)
  • panko breadcrumbs
  • 4 aubergines
  • 4 courgettes
  • 4 red and yellow peppers
  • a handful of chestnut mushrooms
  • 3 tins of plum tomatoes
  • 2 tbsp minced garlic
  • dried thyme
  • dried oregano
  • 2 tbsp balsamic vinegar
  • 1 tbsp brown sugar
  • 1 pint whole milk
  • parmesan rind (the riper the better!)
  • a handful of cheddar cheese
  • a few black peppercorns
  • 2 tbsp butter
  • 1 tbsp plain flour

Instructions

Roast your vegetables

  • Preheat your oven to 180°C and add enough light olive oil to a roasting try to cover the bottom
  • Chop the aubergines, courgettes, peppers and mushrooms into pieces—not too small, and add to the roasting tray
  • Turn the vegetables over to cover with oil (add more if needed) and sprinkle over a little salt
  • Roast until everything looks delicious and sticky, about an hour, turning things every 20 minutes, then turn the oven off

Make the tomato sauce

  • Put a large pan onto a medium heat and add the tinned tomatoes; break the tomatoes up with a wooden spoon and bring up to a simmer
  • Add the minced garlic (I used the paste and it worked perfectly well), thyme, oregano, brown sugar, and balsamic vinegar; turn the heat down to low and simmer for 20 minutes, covered loosely with foil
  • Add salt and pepper (under-season since we’re not done reducing the sauce yet) and simmer for another 40 minutes, stirring regularly to make sure that it doesn’t reduce too much or start to stick to the pan
  • The sauce should end up beomg lovely and thick with a deep tomato flavour; add a glug of olive oil and stir through, add some salt and pepper if required, then take off the heat and set to one side

Make the cheese sauce

  • Add the whole milk to a small saucepan, add the cheese rind and black peppercorns and bring the milk to a gentle simmer; turn the heat off and leave to infuse for 15 minutes, then strain into a jug
  • Wash and dry your saucepan and put over a low heat, melt the butter and whisk in the plain flour, then cook the roux over a low heat for a few minutes until it starts to smell nutty; gradually whisk in the milk to make a bechamel
  • Add the cheddar and whisk the sauce until it thickens up enough to coat the back of a spoon, then take off the heat and season with salt and pepper to taste

Construction

  • Add layers of tomato sauce, roasted vegetables and pasta to an ovenproof dish in whichever configuration you like best, ending up with a layer of pasta on the top (just two layers of pasta for me—this is all about those roasted vegetables)
  • Pour the cheese sauce over to cover the lasagne and then set it aside for half an hour so that it starts to set up slightly
  • Grate over some parmesan and sprinkle a few panko breadcrumbs for texture, then cook at 220°C until the top has gone golden and crispy, which should be about 25 minutes
  • Take the lasagne out of the oven and give it 10 minutes to rest (this will make portioning it up a little easier) and serve with a mound of yummy garlic bread

Is there anything better than roasted aubergine in a nice tomato sauce? I love a good beefy lasagne as much as the next red-blooded individual, but I think that my preference may finally have swung the way of the vegetable when it comes to this dish.

Triple Raspberry Pavlova

Triple Raspberry Pavlova
I really need to persuade Ben and David to write more frequently about BBQ beef ribs, the perfect mole sauce and other delicious umami things like that.  Any munchmun.ch reader would think we’re trying to give them diabetes.  Oh well, here is a pavlova recipe I’ve been working on over the last couple of weeks.  Only give this a go if you’re on friendly terms with your dentist!
Ingredients
250g fresh raspberries
The whites of 4 medium eggs (ones approaching their use by date are ideal for meringue)
220g caster sugar
2 tbsp freeze-dried raspberries
100g white chocolate
1 pot clotted cream
Instructions
Making the shell
Trace the online of a plate onto greaseproof paper and place on a flat baking tray
Pre-heat the oven to 110oC
Take 50g of the raspberries and push them through a sieve using a wooden spoon, reserving the juice
Place your egg whites in a deep bowl and beat using an electric mixer on a high setting
Beat for approximately 3 minutes or until you have stiff peaks (watch you don’t go too far – you’ll end up with a watery froth)
Beat in the caster sugar a tablespoon at a time until the mixture turns glossy
Stir in the freeze-dried raspberries and the raspberry juice gently with a metal spoon. Don’t over mix – you want a swirled effect.
Pipe the mixture onto your traced outline starting at the outside and spiralling in until you reach the middle.  Pipe an extra two layers of mixture on top of the outer circle.
Place in the oven and bake for 1½ hours.  The low heat means that you’re really just drying out the meringue, rather than cooking it through.
Remove from oven and carefully transfer to a wire rack to cool.
Filling the shell
While your shell is cooling, melt the white chocolate over a Bain Marie (reserving a couple of chunks to grate over the top of your pavlova as a finishing touch)
Using a pastry brush, paint the inside of your shell with white chocolate.  Left to set this not only tastes nice but will form a wall between the cream and the meringue which will stop the shell going soggy (and provides a little extra support if things are looking fragile!)
Fill the shell with clotted cream, tip the raspberries on the top and sprinkle over the grated white chocolate.  Consume and die of sugar.

I really need to persuade Ben and David to write more frequently about BBQ beef ribs, the perfect mole sauce and other delicious umami things like that.  Any munchmun.ch reader would think we’re trying to give them diabetes.  Oh well, here is a pavlova recipe I’ve been working on over the last couple of weeks.  Only give this a go if you’re on friendly terms with your dentist!
Pavlova

Ingredients

  • 250g fresh raspberries
  • The whites of 4 medium eggs (ones approaching their use by date are ideal for meringue)
  • 220g caster sugar
  • 2 tbsp freeze-dried raspberries
  • 100g white chocolate
  • 1 pot of clotted cream

Instructions

Making the shell

  • Trace the online of a plate onto greaseproof paper and place on a flat baking tray
  • Pre-heat the oven to 110oC
  • Take 50g of the raspberries and push them through a sieve using a wooden spoon, reserving the juice
  • Place your egg whites in a deep bowl and beat using an electric mixer on a high setting
  • Beat for approximately 3 minutes or until you have stiff peaks (watch you don’t go too far – you’ll end up with a watery froth)
  • Beat in the caster sugar a tablespoon at a time until the mixture turns glossy
  • Stir in the freeze-dried raspberries and the raspberry juice gently with a metal spoon. Don’t over mix – you want a swirled effect
  • Pipe the mixture onto your traced outline starting at the outside and spiralling in until you reach the middle.  Pipe an extra two layers of mixture on top of the outer circle
  • Place in the oven and bake for 1½ hours.  The low heat means that you’re really just drying out the meringue, rather than cooking it through
  • Remove from oven and carefully transfer to a wire rack to cool

Filling the shell

  • While your shell is cooling, melt the white chocolate over a Bain Marie (reserving a couple of chunks to grate over the top of your pavlova as a finishing touch)
  • Using a pastry brush, paint the inside of your shell with white chocolate.  Left to set this not only tastes nice but will form a wall between the cream and the meringue which will stop the shell going soggy (and provides a little extra support if things are looking fragile!)
  • Fill the shell with clotted cream, tip the raspberries on the top and sprinkle over the grated white chocolate.
  • Consume and die of sugar.

Custard Cream Biscuits

Custard Cream Biscuits
I can’t remember why I decided to try and make a batch of custard creams.  I think I caught sight of the lovely Hope & Greenwood confectionary cookbook on my Amazon recommendations (I haven’t bought it yet if you’d like to send a copy my way) and was overwhelmed with nostalgia for ten-penny mix-ups, blue panda pops and ‘special occasion’ biscuits presented on a saucer by my nan.  (http://www.amazon.co.uk/Life-Sweet-Collection-Old-Fashioned-Confectionery/dp/0091932661/ref=sr_1_1?s=books&ie=UTF8&qid=1319131584&sr=1-1)
I feel you have to respect a woman who regarded custard creams as sophisticated but repeatedly rejected my requests for ‘flashy’ party rings.  This recipe is my attempt to find a middle-ground: somewhere between the baroque swirl-adorned custard cream we know and love and an altogether more modern mouthful.
Ingredients – for the biscuits
225g plain flour
50g custard powder
30g icing sugar
175g refrigerated butter (unsalted)
1/2 tsp vanilla bean paste
Ingredients – for the buttercream filling
50g softened butter (unsalted)
200g icing sugar
2 tbsp custard powder
Instructions – for the biscuits
Place the flour, custard powder, icing sugar into a bowl and mix (preferably using an electric mixer for ease)
Chop the butter in to small cubes and add it, and vanilla bean paste, to the flour mixture
Mix until the dough starts to come together, finishing off with a quick knead by hand
Tip the mixture out onto a surface and bring together into a ball (there should be a really pleasing golden-custardy colour to the dough at this stage and it will smell wonderful)
Wrap in cling film and refrigerate for around 30 minutes (and no less than 20)
While the mixture’s in the fridge preheat the oven to 160oC
Once chilled, place the dough on a floured surface and roll to the thickness of a pound coin
Cut out small rounds (mine were about 3cm in diameter) and prick with a fork
Place on a baking tray parchment lined with parchment and bake for 10 minutes (or until just starting to colour around the edges). Watch them carefully – they go from perfect to crispy in moments!
Cool on a wire rack
Instructions – for the biscuits
Place the butter in the bowl of an electric mixer and beat until light and creamy
Slowly incorporate the icing sugar and custard powder and beat until smooth and fluffy
Place the buttercream into a piping bag and pipe onto half of the biscuits sandwiching together with a second biscuit.  These can be fragile little biscuits so a light touch goes a long way here.  And there you have it, a batch of approximately 20 biscuits that will last for a few days in an airtight container or around 30 second if left unattended on a ‘special occasion’ saucer.

I can’t remember why I decided to try and make a batch of custard creams.  I think I caught sight of the lovely Hope & Greenwood confectionery cookbook on my Amazon recommendations (I haven’t bought it yet if you’d like to send a copy my way) and was overwhelmed with nostalgia for ten-penny mix-ups, blue panda pops and ‘special occasion’ biscuits presented on a saucer by my nan.
custard-cream

I feel you have to respect a woman who regarded custard creams as sophisticated but repeatedly rejected my requests for ‘flashy’ party rings.  This recipe is my attempt to find a middle-ground: somewhere between the baroque swirl-adorned custard cream we know and love and an altogether more modern mouthful.

Ingredients

For the biscuits

  • 225g plain flour
  • 50g custard powder
  • 30g icing sugar
  • 175g refrigerated butter (unsalted)
  • 1/2 tsp vanilla bean paste

For the buttercream filling

  • 50g softened butter (unsalted)
  • 200g icing sugar
  • 2 tbsp custard powder

Instructions

For the biscuits

  • Place the flour, custard powder, icing sugar into a bowl and mix (preferably using an electric mixer for ease)
  • Chop the butter in to small cubes and add it, and vanilla bean paste, to the flour mixture
  • Mix until the dough starts to come together, finishing off with a quick knead by hand
  • Tip the mixture out onto a surface and bring together into a ball (there should be a really pleasing golden-custardy colour to the dough at this stage and it will smell wonderful)
  • Wrap in cling film and refrigerate for around 30 minutes (and no less than 20)
  • While the mixture’s in the fridge preheat the oven to 160oC
  • Once chilled, place the dough on a floured surface and roll to the thickness of a pound coin
  • Cut out small rounds (mine were about 3cm in diameter) and prick with a fork
  • Place on a baking tray parchment lined with parchment and bake for 10 minutes (or until just starting to colour around the edges). Watch them carefully – they go from perfect to crispy in moments!
  • Cool on a wire rack

For the buttercream

  • Place the butter in the bowl of an electric mixer and beat until light and creamy
  • Slowly incorporate the icing sugar and custard powder and beat until smooth and fluffy

Place the buttercream into a piping bag and pipe onto half of the biscuits sandwiching together with a second biscuit.  These can be fragile little biscuits so a light touch goes a long way here.  And there you have it, a batch of approximately 20 biscuits that will last for a few days in an airtight container or around 30 second if left unattended on a ‘special occasion’ saucer.
custard cream

Summer Seafood Stew

Summer Seafood Stew
Here is a great recipe for a light but flavourful summer stew.  It’s based on a classic Spanish recipe called suquet de peix but with a few substitutions to account for our love of mussels, hatred of celery and what was available on the booze shelf.  There’s a fair amount of preparation going on here but it’s worth it for the depth of flavour in the resulting broth (which mops up well with crusty bread) and I can guarantee you’ll be back for second helpings.
Ingredients
For the sauce
2 tbsp olive oil
2 shallots, chopped
1 carrot, chopped
1 leek, chopped
1 bulb fennel, chopped
2 cloves garlic, chopped
30g tomato purée
4 large tomatoes, chopped
60ml whisky (traditionally you should use brandy)
175ml white wine
300g mixed salmon and cod, chopped
900ml pints fish stock (we made ours from scratch which was dead easy) http://www.bbc.co.uk/food/recipes/fishstock_90209
1 tsp herbs de Provence
1 sprig tarragon
pinch cayenne pepper
For the stew
400g assorted fish and shellfish (we used sustainably sourced salmon, coley, mussels and cockles for the pictured dish but we’ll definitely replace the cockles with clams next time)
12 new potatoes, quartered and cooked
1 large carrot, sliced and cooked
80g fine beans, chopped and cooked
80ml double cream
1 tbsp chopped fresh parsley
The juice of 1 lemon
salt and pepper
Instructions
For the sauce, heat the oil in a saucepan. Add the shallots, leek, carrot, fennel, and garlic and fry for 10 minutes over a low heat until soft.
Add the tomato purée, chopped tomatoes, white wine and whisky and cook to reduce by half.
Add the chopped salmon and cod and cook for five minutes.
Add the stock, herbs de Provence, tarragon and cayenne pepper, then cover and simmer for 40 minutes.
Blend the mixture, then push through a sieve (this bit takes ages but be patient!).
For the stew, pour the sieved sauce back into a large saucepan and bring to the boil. Add the fish and vegetables and simmer for 3-4 minutes.  The fish should be cooked and the shellfish open.
When cooked, stir in the double cream and mix through the parsley.
Stir in the lemon juice and season. Serve with crusty bread and salty butter.

Here is a great recipe for a light but flavourful summer stew.  It’s based on a classic Spanish recipe called suquet de peix but with a few substitutions to account for our love of mussels, hatred of celery and what was available on the booze shelf.  There’s a fair amount of preparation going on here but it’s worth it for the depth of flavour in the resulting broth (which mops up well with crusty bread smothered in salty butter) and I can guarantee you’ll be back for second helpings.
Stew1

Ingredients

For the sauce

  • 2 tbsp olive oil
  • 2 shallots, chopped
  • 1 carrot, chopped
  • 1 leek, chopped
  • 1 bulb fennel, chopped
  • 2 cloves garlic, chopped
  • 30g tomato purée
  • 4 large tomatoes, chopped
  • 60ml whisky (traditionally you should use brandy)
  • 175ml white wine
  • 300g mixed salmon and cod, chopped
  • 900ml pints fish stock (we made ours from scratch which was dead easy)
  • 1 tsp herbs de Provence
  • 1 sprig tarragon
  • pinch cayenne pepper

For the stew

  • 400g assorted fish and shellfish (we used sustainably sourced salmon, coley, mussels and cockles for the pictured dish but we’ll definitely replace the cockles with clams next time)
  • 12 new potatoes, quartered and cooked
  • 1 large carrot, sliced and cooked
  • 80g fine beans, chopped and cooked
  • 80ml double cream
  • 1 tbsp chopped fresh parsley
  • the juice of 1 lemon
  • salt and pepper

Instructions

  • For the sauce, heat the oil in a saucepan. Add the shallots, leek, carrot, fennel, and garlic and fry for 10 minutes over a low heat until soft.
  • Add the tomato purée, chopped tomatoes, white wine and whisky and cook to reduce by half.
  • Add the chopped salmon and cod and cook for five minutes.
  • Add the stock, herbs de Provence, tarragon and cayenne pepper, then cover and simmer for 40 minutes.
  • Blend the mixture, then push through a sieve (this bit takes ages but be patient!).
  • For the stew, pour the sieved sauce back into a large saucepan and bring to the boil. Add the fish and vegetables and simmer for 3-4 minutes.  The fish should be cooked and the shellfish open.
  • When cooked, stir in the double cream and mix through the parsley.
  • Stir in the lemon juice and season.

Homemade Plum Gin

Plum Gin

I’ve been planning to make some Sloe Gin, but as the berries won’t be ripe for months the project is on hold. In the mean time we’ve acquired rather a lot of plums (from a friends garden), which Becky has been converting in to plum jam and I’ve been mixing up with some gin.

I looked at a few recipes, all much of a muchness of plums + sugar + gin with varying quantities. In the end I used this recipe, straight forward and well written. Everything came together really easily, probably less than 10 minutes work. The two large Kilner jars are going to get a shake every day for the next week then popped in a dark cupboard for a few months, right in time for winter. Exciting!

National Geographic on food variety

Having just harvested this year’s crop of potatoes and eagerly awaiting our slow-growing beetroot and ripening tomatoes, I was particularly interested in this graph published by National Geographic.  It shows how, in America, people have come to depend on a handful of commercial varieties of fruits and vegetables and thousands of heirloom varieties have disappeared (approximately 93 percent of varieties became extinct in the 20th century).  I’m certain the story is pretty much the same in the UK and I’m left wondering how we can prevent further loss  in future.  I know it’s a small step, but we’ll certainly be sourcing our seeds from a Heritage Seed Library next year.

Graph